Running full Windows XP on USB disk
In this post, I'll show you how to make a full winxp running on usb disk. Hope it will make you love winxp for more !

Objective :
To make this works, you will need to put a full winxp (full or mini or lite is up to you) installed with winVblock driver in a vhd disk image. Then use grub4dos to boot the image.
Terminologies :
vhd (Virtual Hard Disk) : It looks like a file which contains a whole harddisk (and its partitions inside).
winVblock : SCSI driver to make winxp read/write to vhd disk image. Many thanks to Sha0 for this.
grub4dos : bootloader is used to load/map the vhd file.
Primary steps :
1. Create vhd disk image includes winxp (installed with winVblock) :
+ Install VirtualBox (http://www.virtualbox.org). We will use VirtualBox to make the vhd disk.
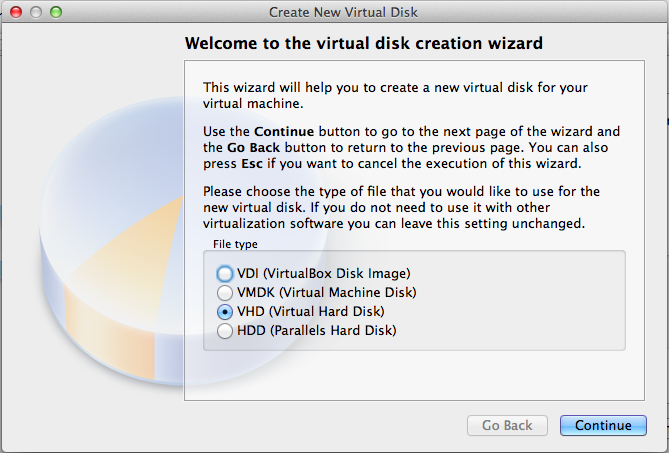
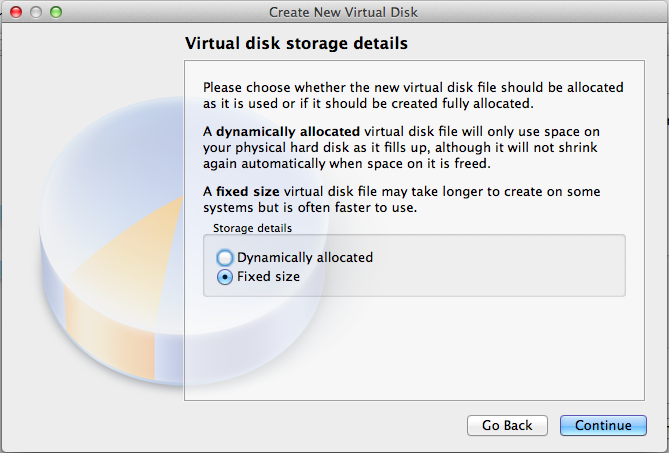
+ Create new virtual machine using vhd harddisk format, fixed-size. Notice the harddisk size need to be smaller than the usb size (2GB for example - full winxp).
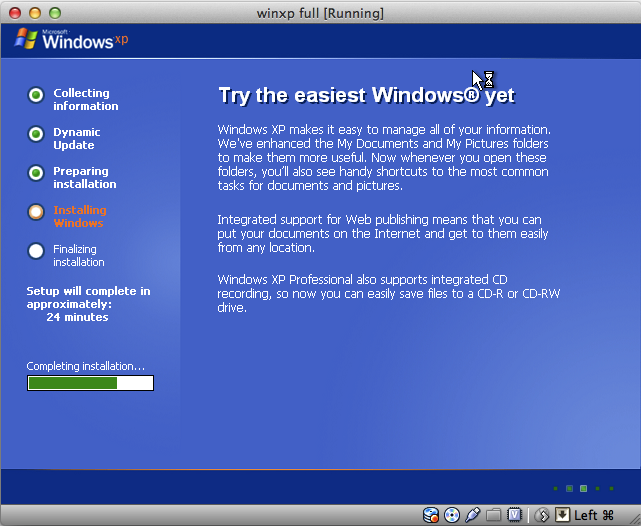
+ Install winxp to the virtual machine as usual.
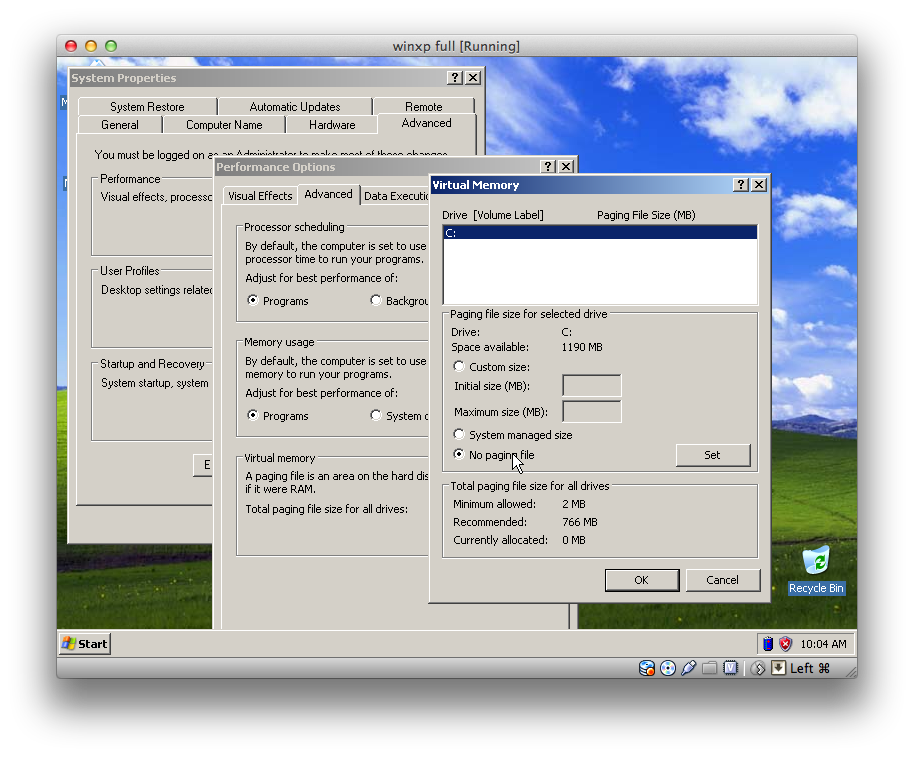
+ Disable page-file.
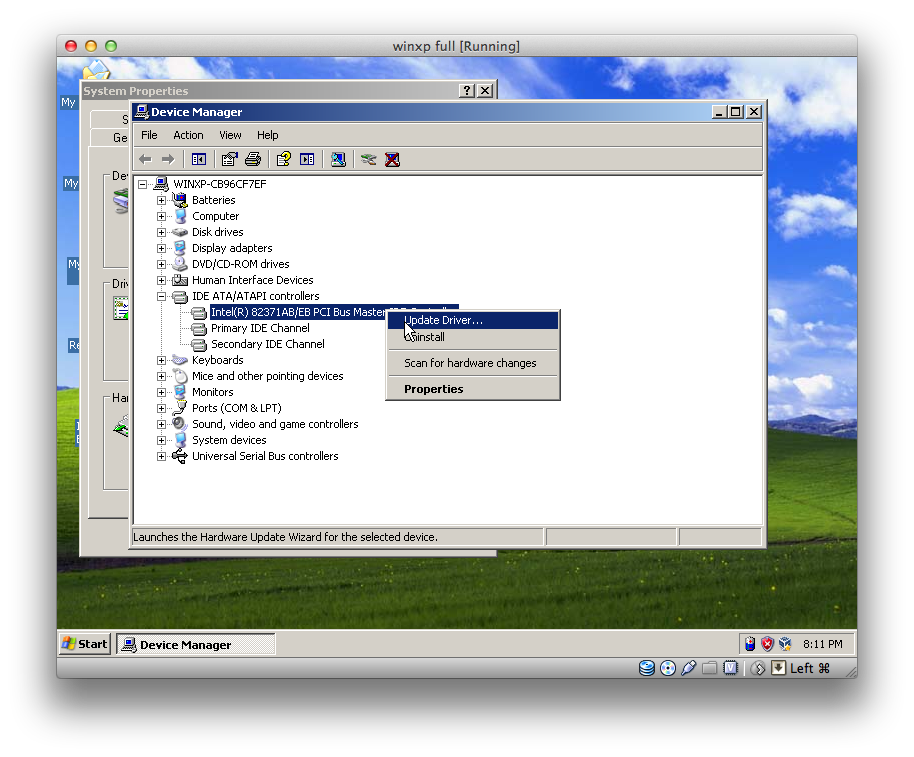
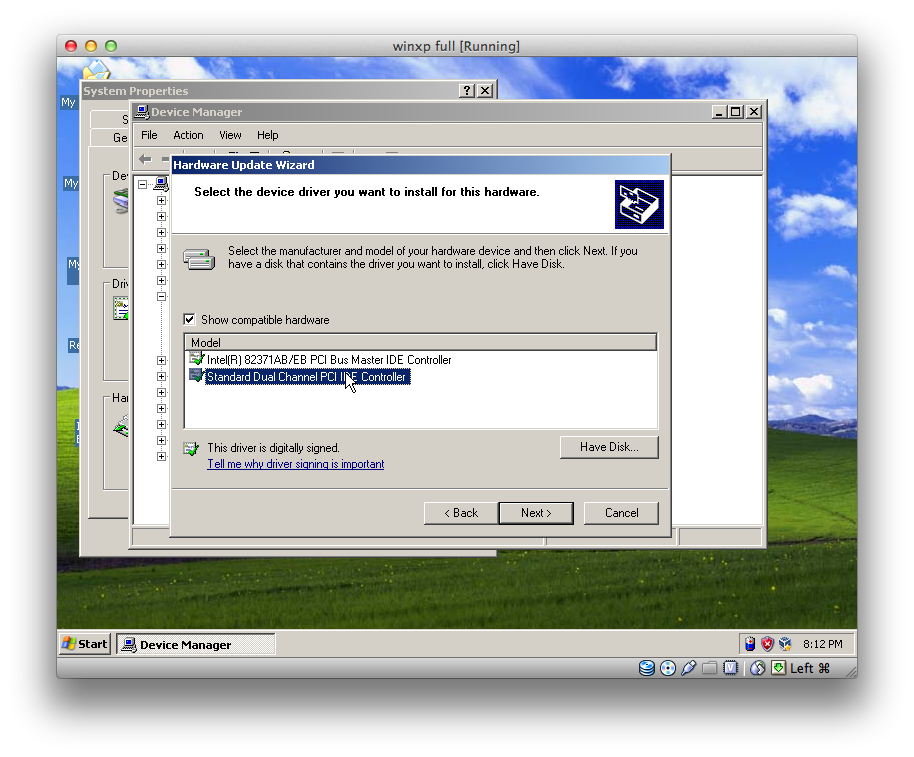
+ Update the IDE/ATAPI controller to use Standard driver. => to boot to different machine.
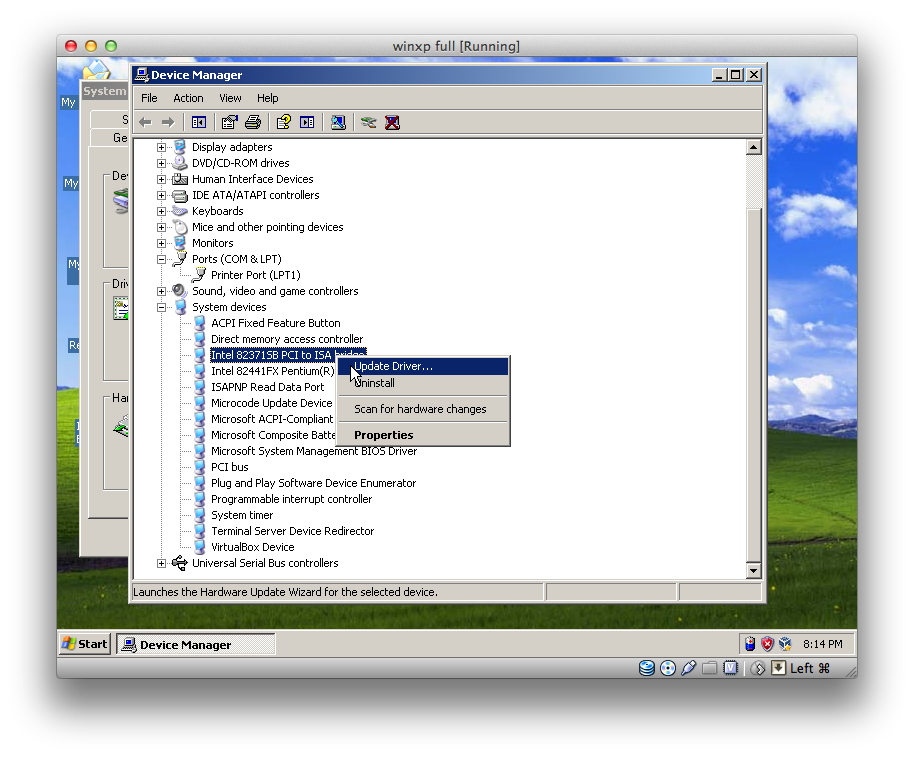
+ Update the System Devices to use Standard driver.
+ Install winVblock driver.
+ Defragement the windows drive (c:)
2. Make the usb disk bootable :
+ Plug the usb disk to a real PC running winxp.
+ Format the usb with ntfs (backup it first !!!). Set it active.
+ Copy file ntldr, ntdetect.com, boot.ini to the root of usb disk.
+ Use "bootsect.exe /nt52" to place the ntloader bootcode to the boot sector of the usb disk.
+ Download grub4dos. Extract : grldr, grldr.mbr to the root of the usb drive.
+ Point the boot.ini file to load grldr.
+ Copy the vhd image (was created in step 1) to the usb disk.
3. Boot the vhd image :
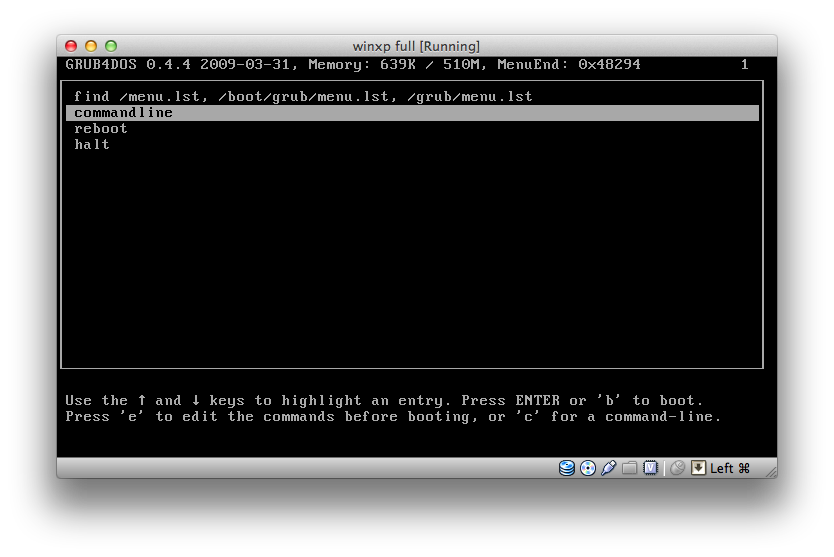
+ Boot from usb disk. It will load ntldr, then load grldr. Chose command line.
+ Load the winxp by typing commands :
++ map (hd0,0)/winxpfull.vhd (hd0)
++ map --hook
++ chainloader (hd0,0)/ntldr
++ boot
+ It works !!!
+ Add menu.lst file to use menu instead of command line.
Known issue :
+ Not contiguous image file : You need to defragement the image file before load it.
+ Boot hang on new machine with SATA/AHCI controllers : Enter BIOS and switch the SATA/AHCI controller to use Compatible/Legacy mode.
More Detail Step by Step
Winxp is really a good member of windows family. It is maybe the most
common version of windows has ever used until now. This post will show
you how to put a full winxp on usb disk to use it anywhere.

In this post we will use VirtualBox to make an Winxp virtual machine with vhd disk image (fixed-size harddisk) (2GB for example) in vhd format. Notice to use fixed-size hard disk, otherwise Grub4Dos won't work !

 Point the CDROM drive to an Winxp installation disc (.iso), and install it as usual till it finishes.
 1.2 Disable Page File :
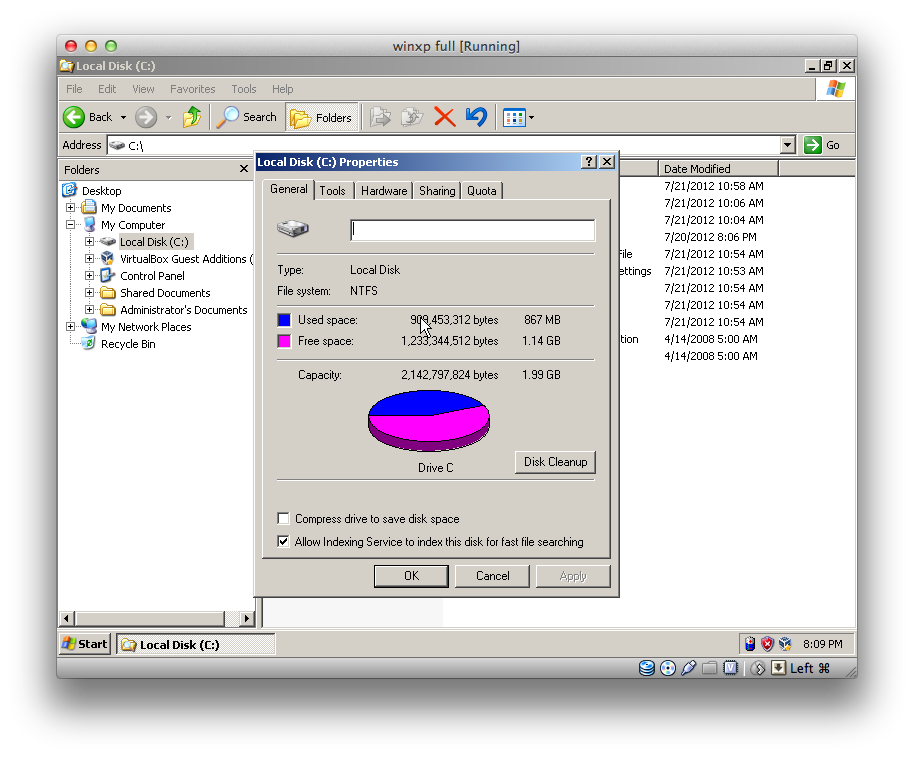
By default Winxp uses a page-file (double RAM size) on the C: drive, it
takes alot of disk space. We don't need it, so we will remove it, and a
full Winxp will takes about 900MB in size.


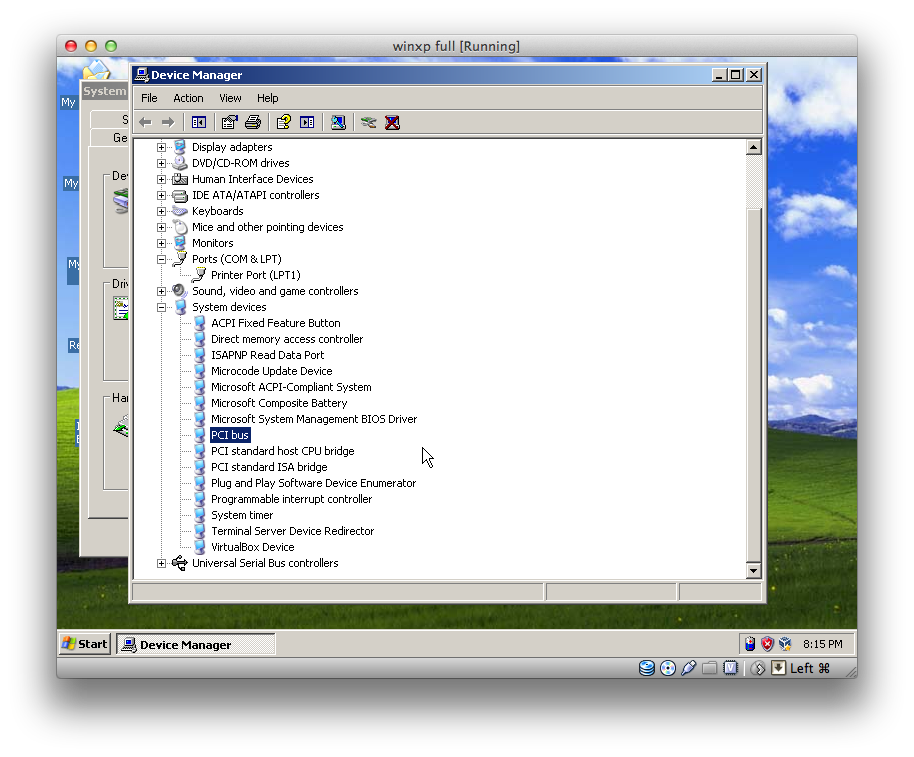
1.3 Config the Winxp driver to make it works on all machine :
Because our Winxp will run on USB disk, we need to make it able to run on all of different machine without depend on the driver (independent with driver) by making some devices using Standard Driver.
Open the Device Manger and update : IDE ATA/ATAPI Controllers and System Devices to use
Standard driver. In this case, they should use :


 Reboot the virtual machine if necessary, and you should have a status like this after all :
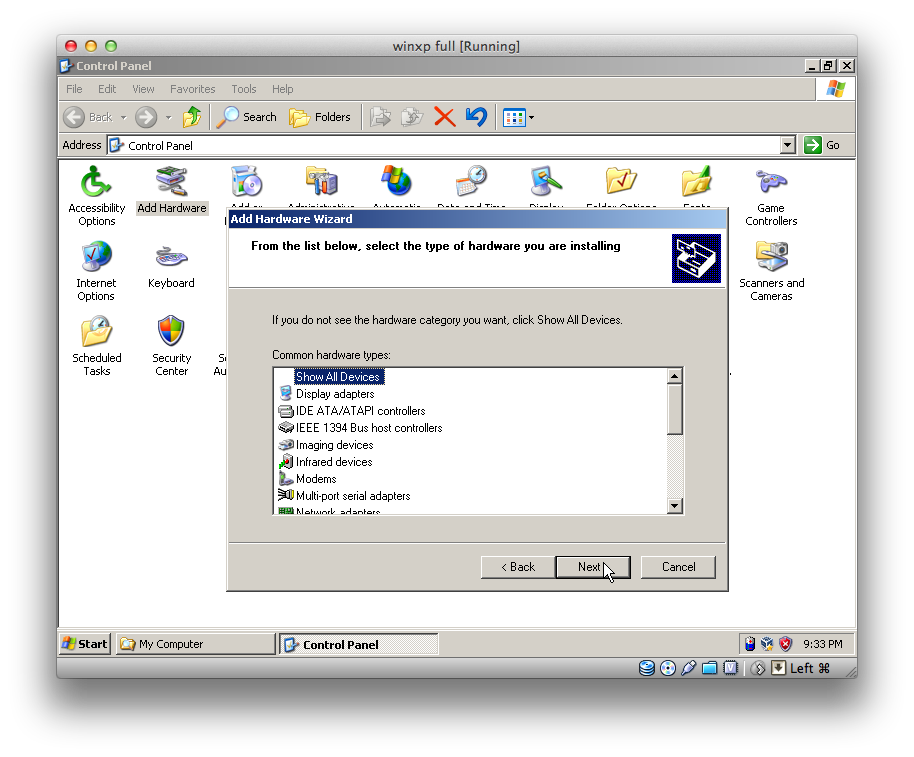
 1.4 Install WinVblock driver :
Google and download the WinVblock driver (or you can download a copy here : https://drive.google.com/file/d/0B3OvTrPZEcO9MTZzVGxVekpqR00/edit?usp=sharing), unzip it. Open Control Panel / Add Hardware. Follow the Wizard and point it to the WinVblock driver folder.
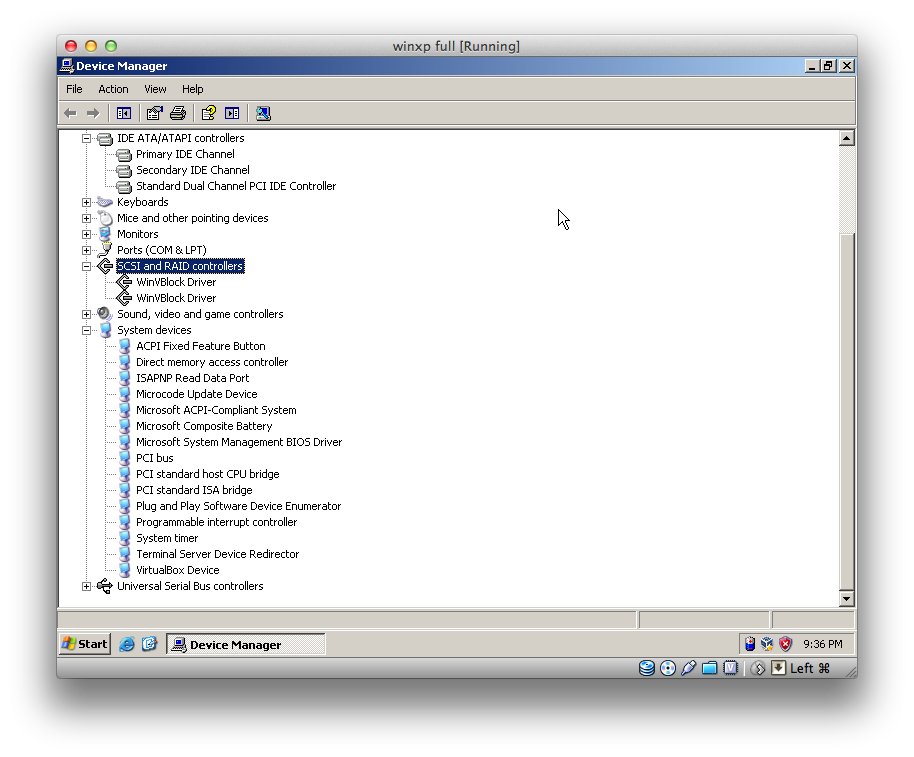
After reboot the Winxp vitual machine, It should have 2 more scsi devices like this.

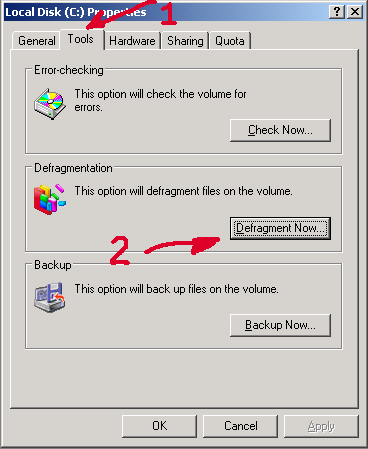
 1.5 Defragment the C drive :
In order to boot with Grub4Dos (map to file), the image file need to be in contiguous disk area.
________________________________________________________________Requirement :
- Ability to use some VirtualMachine Management like VirtualBox, VMware, ...
- Good knowledge at using Winxp.
Terminology :
- Vhd file : It looks like an image of a disk (and partitions) inside.
- WinVBlock : Virtual scsi driver for Winxp to mount vhd disk image.
- NTloader : Boot loader of Windows works with ntldr file.
- Grub4Dos : Boot loader used to map vhd disk image file.
Primary steps :
- Create .vhd disk image includes a running Winxp (with WinVblock driver installed).
- Make USB disk bootable with NTloader and Grub4Dos.
- Boot the image by Grub4Dos.
Steps in detail :
1. Create .vhd disk image includes Winxp (with WinVblock driver installed)
1.1 Create New Machine :In this post we will use VirtualBox to make an Winxp virtual machine with vhd disk image (fixed-size harddisk) (2GB for example) in vhd format. Notice to use fixed-size hard disk, otherwise Grub4Dos won't work !
1.3 Config the Winxp driver to make it works on all machine :
Because our Winxp will run on USB disk, we need to make it able to run on all of different machine without depend on the driver (independent with driver) by making some devices using Standard Driver.
Open the Device Manger and update : IDE ATA/ATAPI Controllers and System Devices to use
Standard driver. In this case, they should use :
- IDE ATA/ATAPI Controller :
- Standard Dual Channel PCI IDE Controller.
- System Devices :
- PCI bus.
- PCI standard host CPU bridge.
- PCI standard ISA bridge.
Google and download the WinVblock driver (or you can download a copy here : https://drive.google.com/file/d/0B3OvTrPZEcO9MTZzVGxVekpqR00/edit?usp=sharing), unzip it. Open Control Panel / Add Hardware. Follow the Wizard and point it to the WinVblock driver folder.
After reboot the Winxp vitual machine, It should have 2 more scsi devices like this.
In order to boot with Grub4Dos (map to file), the image file need to be in contiguous disk area.
Just have a check if the C: drive has been fragmented ? If does, open
the My Computer, right click on C: drive / Properties / Tools /
Defragment Now ...
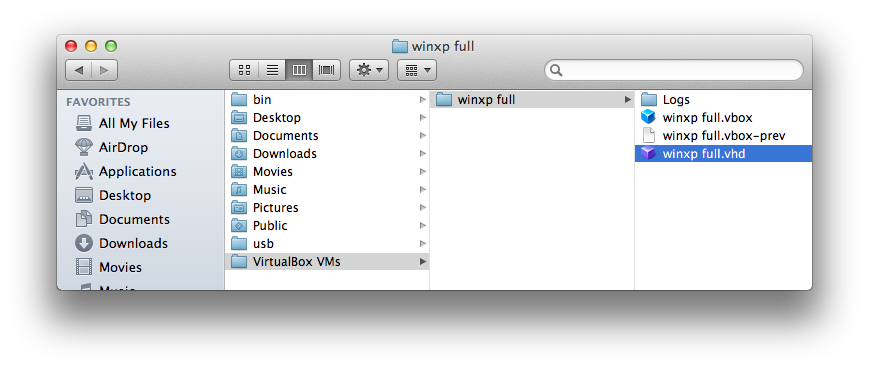
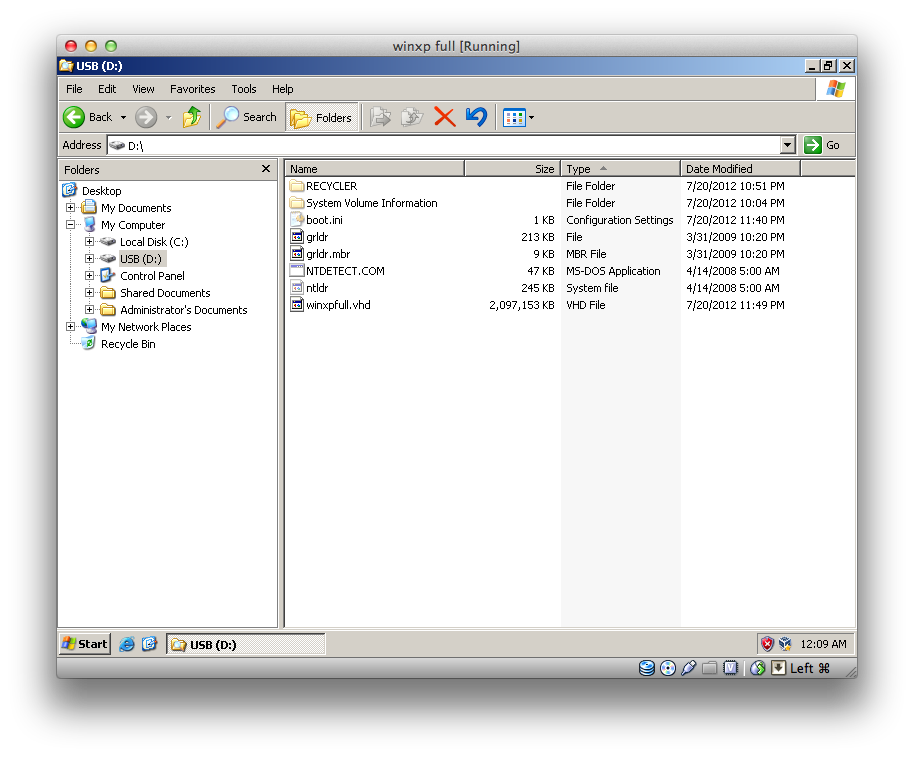
 1.6 Locate the vhd file :

You need an USB disk larger than the disk image (4GB in this post).
Format it with NTFS filesystem or FAT32 (make sure to backup it first
!!!)
 2.2 Make the USB disk bootable :
After format, suppose it has been mounted as D: drive. We will make it bootable by :

 Now you need to place the ntloader bootcode onto the MBR of the USB disk. You will need the bootsect.exe tool (search for it in the WinVista or Win7 installation disc, or download it here : https://drive.google.com/file/d/0B3OvTrPZEcO9NGVCeFpPNmRIUEE/edit?usp=sharing ), copy it to the C: drive. Then execute the command :
Now the USB disk can bootable, next we need to point NTLoader to load Grub4Dos. Edit the boot.ini file :
[boot loader]

 So, we now have the USB disk bootable according to :
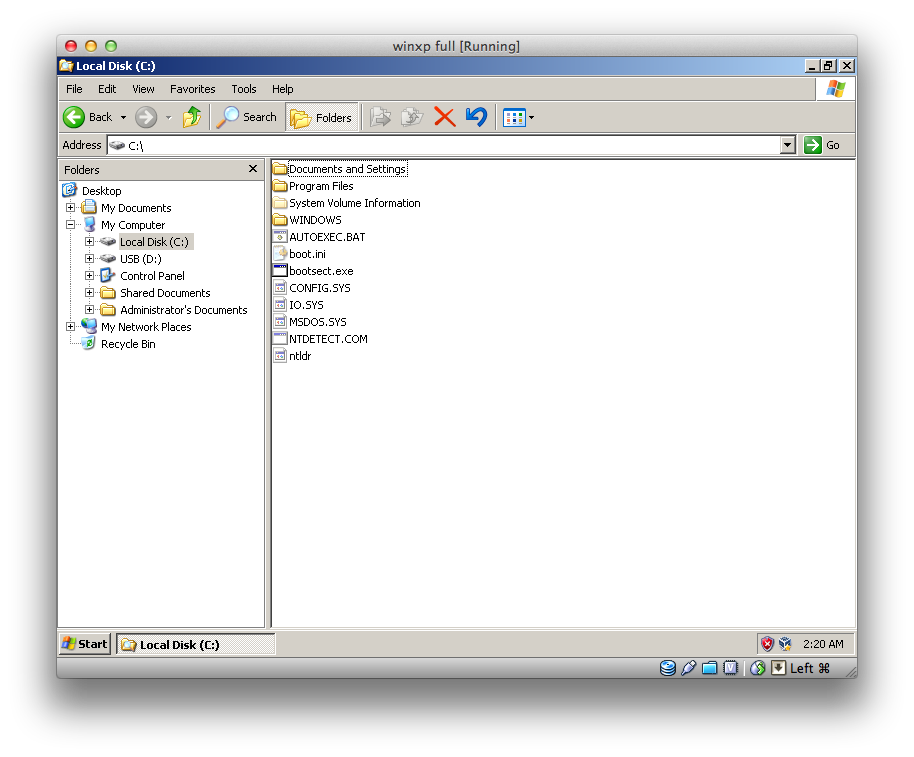
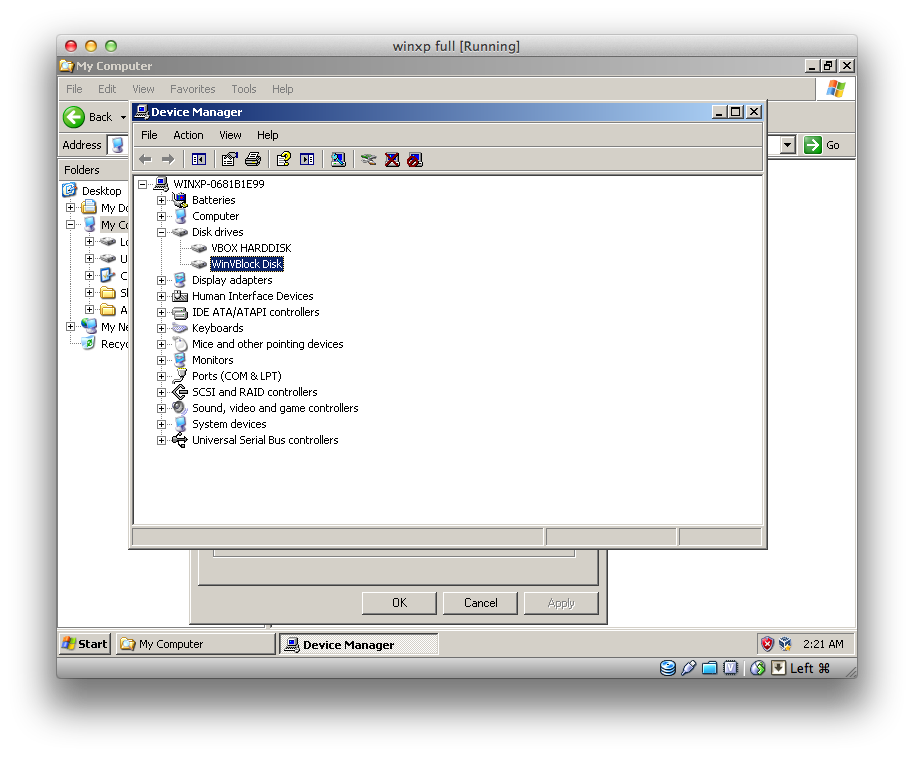
 and the WinXP image will be loaded as usual ... When done, you will see
the disk image has been mounted as C: drive and the USB disk as D:
drive. In Device Manager there also have a WinVblock disk appears under
the Disk drive entry.
and the WinXP image will be loaded as usual ... When done, you will see
the disk image has been mounted as C: drive and the USB disk as D:
drive. In Device Manager there also have a WinVblock disk appears under
the Disk drive entry.

 so we've almost done.
3.3 Create Grub4Dos menu entry :
Now we will create a menu entry for auto loading the image instead of
manually typing the commands. On the USB disk (D: drive), create a text
file named D:\menu.lst with the content :
timeout 5
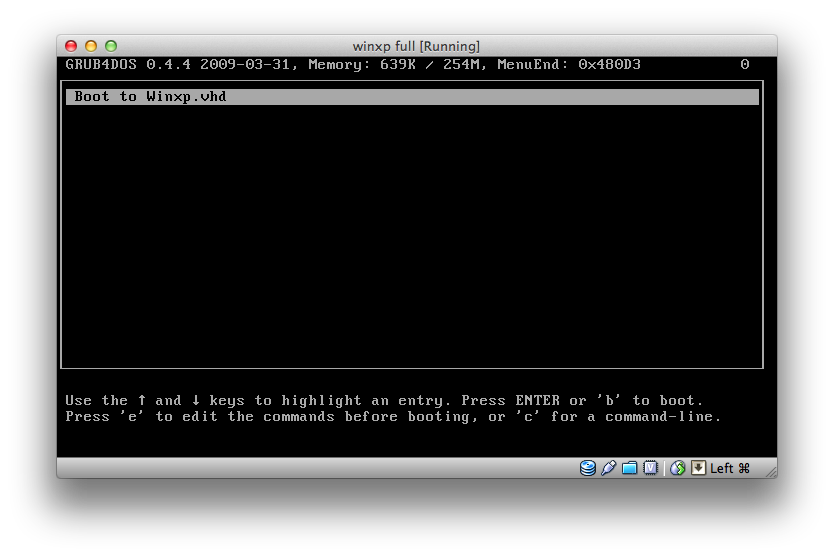
Reboot the PC and boot from USB to see the result :

 So, we have done for a full Winxp running in USB disk. You can try it on different PC to see the result.
Until now, you should have a running Winxp virtual machine includes :
- WinVBlock driver.
- Some devices with Standard driver (IDE controller and system devices)
- C: drive not fragmented.
2. Make USB disk bootable with NTloader and Grub4Dos
2.1 Format the USB :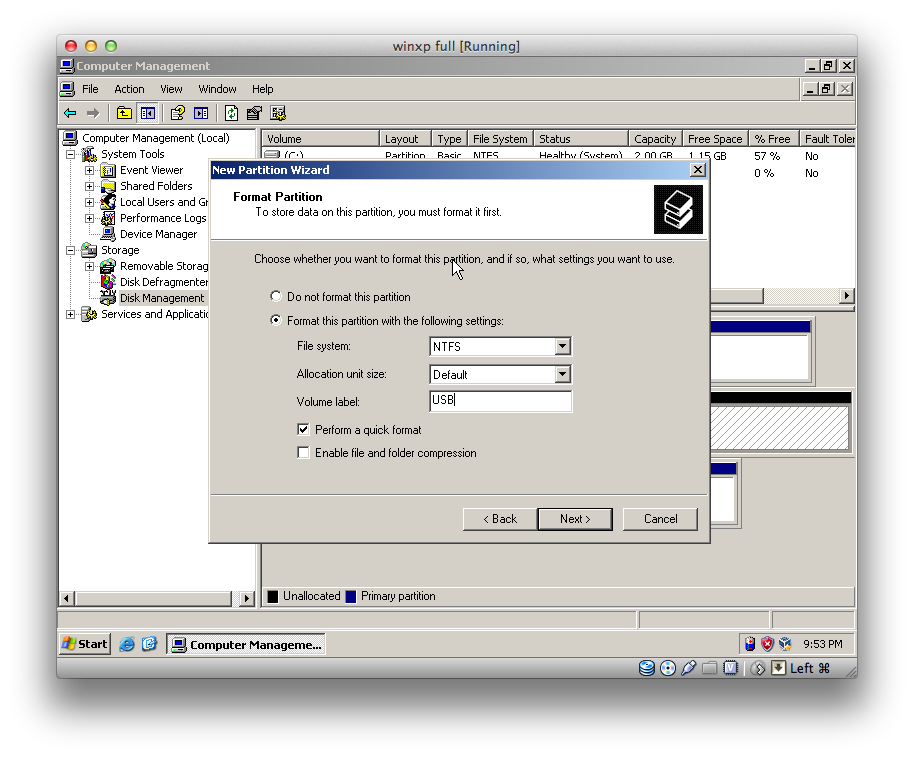
After format, suppose it has been mounted as D: drive. We will make it bootable by :
- Make it as active partition (open Disk Management and right click / Set Active).
- Copy from C: drive these files (maybe you need to set Folder Options to show all hidden file) : ntldr, ntdetect.com, boot.ini.
- Search and download the Grub4Dos tool (or download here : https://drive.google.com/file/d/0B3OvTrPZEcO9M2hGZERaVHdJVUE/edit?usp=sharing ). Unzip it. Copy these files to the USB (D: drive) : grldr, grldr.mbr

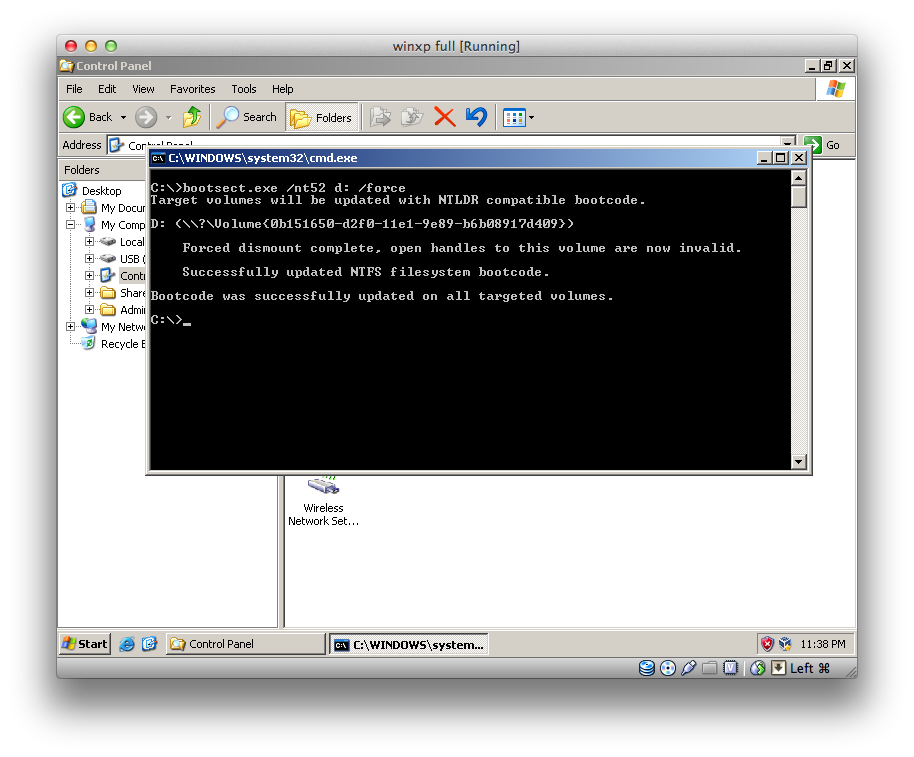
c:\bootsect.exe /nt52 d: /force
[boot loader]
timeout=10
default=c:\grldr
[operating systems]
c:\grldr="Grub4Dos"
Save the boot.ini file.
Let's restart the PC and boot from USB disk. The NTloader will load Grub4Dos according to the boot.ini file.
- Primary Active partition.
- NTloader in the MBR : ntldr, ntdetect.com, boot.ini
- Grub4Dos at second stage : grldr, grldr.mbr
3. Boot the image by Grub4Dos.
3.1 Copy the vhd disk image to USB disk :
Restart the PC and copy the vhd image file (has been located at 1.6
step) to the USB disk. You should rename it from "winxp full.vhd" to "winxpfull.vhd" to kill the blank space.
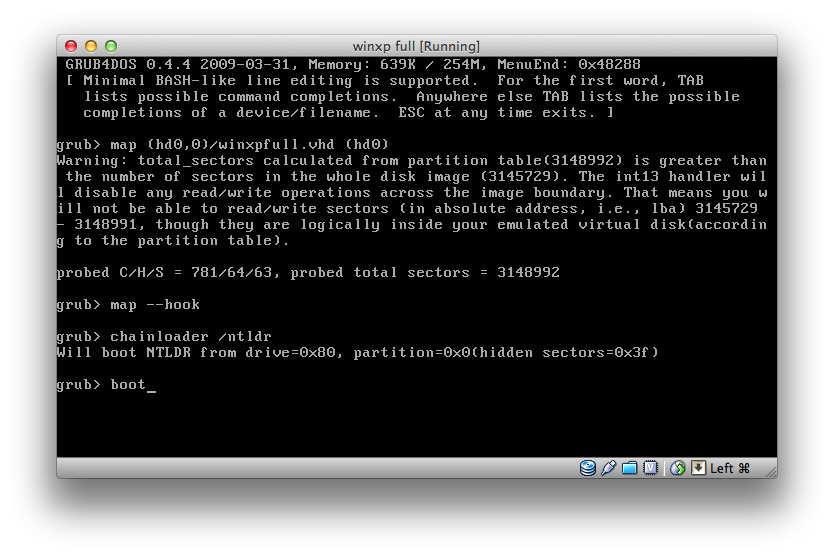
 3.2 Boot the disk image :
Reboot the PC and boot from USB disk, when Grub4Dos has been loaded, choose the command line menu. Enter these commands to load the WinXP image :
map (hd0,0)/winxpfull.vhd (hd0)
Reboot the PC and boot from USB disk, when Grub4Dos has been loaded, choose the command line menu. Enter these commands to load the WinXP image :
map (hd0,0)/winxpfull.vhd (hd0)
map --hook
chainloader (hd0,0)/ntldr
boot
3.3 Create Grub4Dos menu entry :
timeout 5
default 0
title Boot to Winxp.vhd
map (hd0,0)/winxpfull.vhd (hd0)
map --hook
chainloader (hd0,0)/ntldr
Reboot the PC and boot from USB to see the result :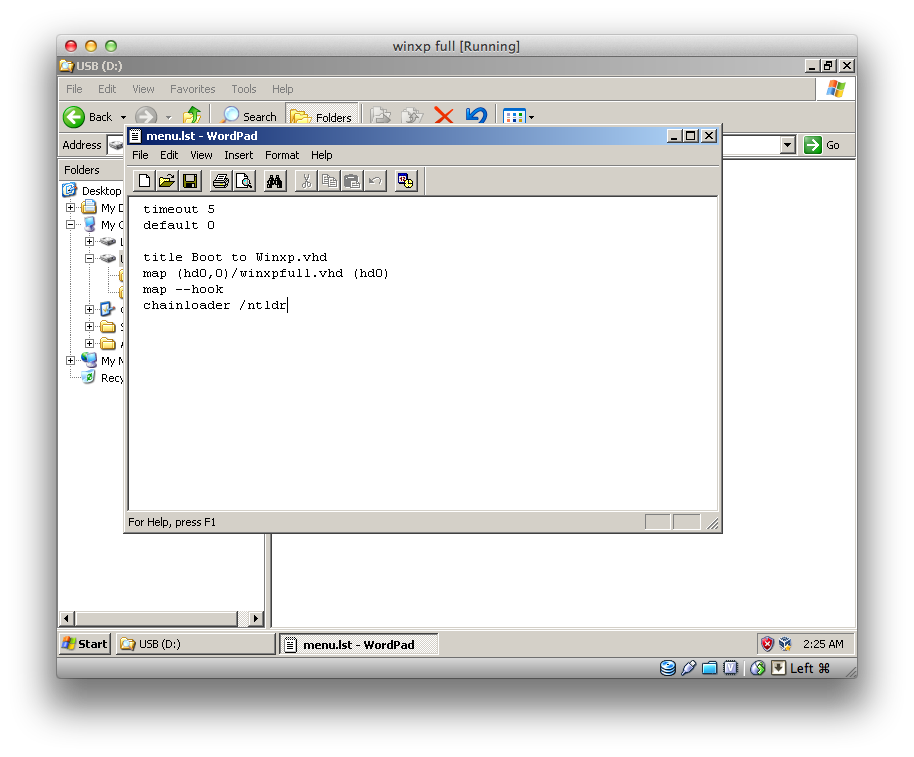
Known issue :
- Not contiguous image file : You need to defragement the image file before load it.
- Boot hang on new machine with SATA/AHCI controllers : Enter BIOS and switch the SATA/AHCI controller to use Compatible/Legacy mode
Need More Detail ? contact me !!
I sell a lot of stuff, program. knowledge, etc.. at a small cost.
I will guide you step by step, personally.
My Paypal Account is : ksw.industries@gmail.com
Don't know how to send money ? Click here for detail about Paypal account.
http://xyberpast.blogspot.com/2014/05/how-to-get-my-program.html
Don't have money? OK! Here is another way to get the program.
how to get my program - Free of charge
No comments:
Post a Comment